Winter-Proof Your Garage Door to Prevent Costly Repairs
When winter hits the Keystone State, Pennsylvanians don their snow boots and crank up the heating. Just like you need protection against the chill, so does your garage door. Freezing temperatures and icy conditions can affect the performance of this crucial system.
Savvy homeowners know the value of preparing before the mercury plummets. Grab a hot cup of cocoa and explore DIY maintenance and troubleshooting tips for winterizing your garage door.
Top Tips for Garage Door Winter Maintenance in Pennsylvania
Your garage door often acts as a secure entry point to your home. During the chilly season, it can also let in cold air, icy temperatures, moisture and pests looking for warmth. Follow these eight tips to get your door winter-ready:
1. Inspect Your Garage Door From Top to Bottom
Effective maintenance starts with a comprehensive inspection. Check your garage door and its components before winter starts to identify any wear, damage or potential issues.
Look for:
- Gaps or light around the perimeter of the door
- Cracked or deteriorated weatherstripping
- Damaged panels, rusted metal parts or warped tracks
- Water infiltration, drafts or signs of pests
2. Keep the Tracks Clean
Tracks and rollers are responsible for the smooth movement of your garage door. Dirt, grime or winter ice buildup can obstruct the rollers. Clean the tracks by vacuuming up debris, then following up with a damp cloth or small brush.
3. Lubricate Vital Moving Components
The smallest parts of your garage door often work the hardest. Moving metal components, like hinges or rollers, need lubrication to perform their best. It reduces friction, protects against rust and prevents premature wear. Use a silicone-based lubricant instead of grease, which can harden in cold temperatures.
Apply lubricant to the following moving parts:
- Hinges
- Rollers
- Springs
- Bearing plates
- Armbar
- Top rail and lock
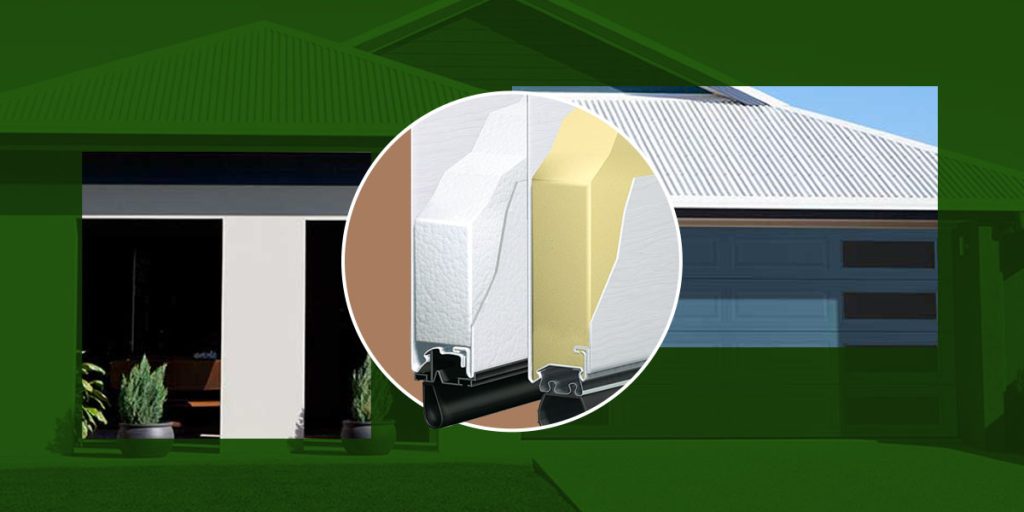
4. Install or Reinforce Garage Door Insulation
Insulation is your secret weapon in the battle against winter chill. A well-insulated garage door stops heat from escaping, stabilizing indoor temperatures.
If your door already has insulation, check it for wear or damage. For uninsulated doors, you can buy a DIY insulation kit or install a new, insulated garage door. R-value is the golden measurement for insulation. It tells you how well an insulating material can resist heat transfer — a higher number means better thermal performance.
5. Replace Worn Weatherstripping
Like insulation, weatherstripping helps to defend your garage door against the elements. It forms a watertight seal around the door’s perimeter. Damaged weatherstripping can allow drafts and moisture into the garage.
Check the seals at the bottom, top and sides of your garage door — compromised seals will need replacement. Replacing weatherstripping involves:
- Removing the old seals
- Cleaning and drying the surface
- Measuring and cutting the new material
- Installing and securing the weatherstripping
- Checking for gaps
While it seems easy, effective weatherstripping replacement is time and labor-heavy. Professional garage door experts can simplify the process. They often include weatherstripping inspections and replacement as part of scheduled maintenance.
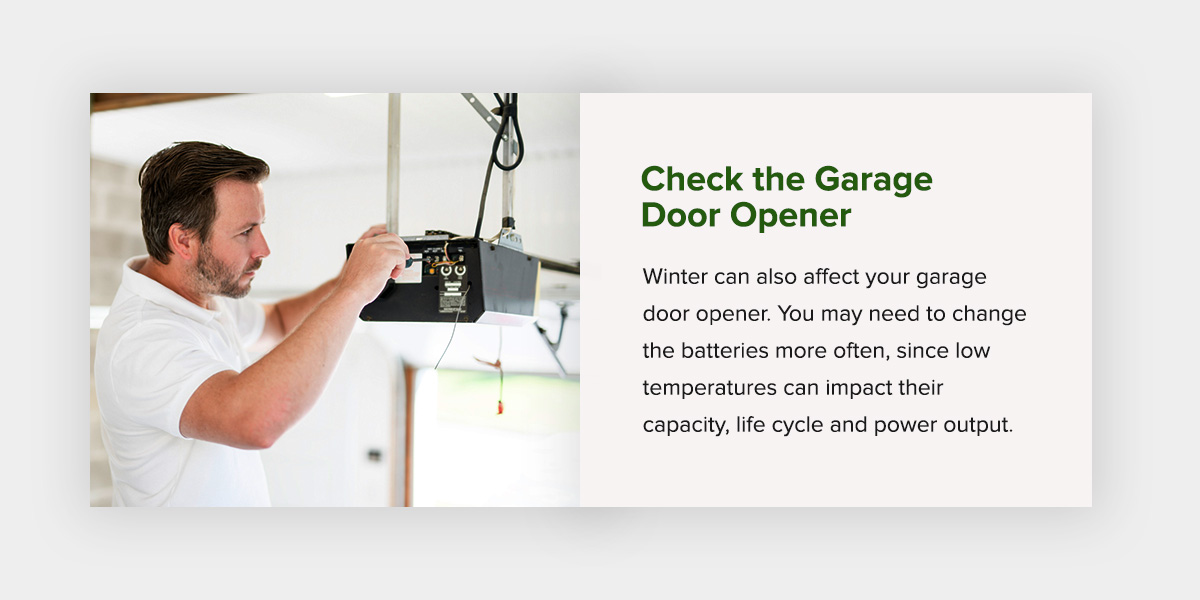
6. Check the Garage Door Opener
Winter can also affect your garage door opener. You may need to change the batteries more often, since low temperatures can impact their capacity, life cycle and power output. If cold air enters the opener housing, it can affect motor performance. Inspect the housing for cracks or condensation.
A faulty garage door opener may need professional repair or complete replacement.
7. Align and Test the Safety Sensors
Safety sensors are the guardian angels of your garage door. They detect obstructions, stopping the door from closing on people, pets or objects. You can find these “eyes” on either side of the door, near the bottom of the frame.
Keep the sensors clean by wiping them with a soft cloth. Check their alignment by looking for a steady light on either receiver — a blinking light signals a problem. You can adjust misaligned sensors yourself or contact a professional for help.
8. Test for Proper Door Balance
All the parts of your garage door work together to hold its weight. Even weight distribution, or balancing, is crucial for safe and efficient operation. An unbalanced door could crash shut without warning, causing a serious safety risk to people, pets and vehicles.
Perform this DIY test to check the garage door balance:
- Close the garage door and disengage the automatic opener.
- Open the garage door manually about halfway, checking for easy, fluid movement.
- Let the door go — if it remains open, the door is well-balanced.
- If the door is heavy, difficult to open or drops closed, it needs rebalancing.
Unbalanced garage doors require professional service from a trained technician.
Troubleshooting Common Garage Door Cold-Weather Issues
When the cold weather sets in, the last thing any homeowner wants is a stuck garage door. Here are some solutions to cold-weather garage door problems:
Frozen Garage Door
You arrive home on a chilly day to find your garage door frozen shut.
- Cause: In winter, water around the bottom track and seals of your door can freeze, causing it to become stuck. Extreme cold can also cause metal components to contract and seize up. Grease may harden, causing the door to become stiff.
- Solution: To prevent your garage door from freezing, clear snow and ice as soon as possible. Lubricate all the moving parts before winter. Apply the same silicone-based lubricant to the bottom seal to stop it from sticking to the ground.
Slow or Jerky Movement
Freezing conditions can cause your garage door to operate slowly or not at all.
- Cause: Low temperatures cause lubricants to thicken and metal to contract, which impacts the opener and garage door components.
- Solution: Use silicone-based lubricants, as these perform better in lower temperatures. If necessary, contact a garage door technician for professional inspection and repairs to prevent major damage.
Broken Springs or Cables
Springs and cables are vital parts of your garage door system. When these fail, your door becomes inoperable.
- Cause: A broken garage door spring in cold weather happens when extreme temperatures make the metal brittle. An already weakened spring or cable can snap.
- Solution: Spring replacement is a dangerous repair that warrants professional attention.
Reasons to Weatherproof Your Garage Door
Winterizing your garage door can save you time, money and headaches. The benefits include:
Better Energy Efficiency
An insulated garage door can help cut your energy costs. It reduces heat transfer, which can ease the burden on your heating system during winter. Adding insulation to your home can save you up to 10% on your annual energy bills.
Weatherproofing your garage door stabilizes temperatures in the garage and connected spaces. You enjoy a cozier, more comfortable home.
Prevents Costly Repairs
Weatherproofing your door can save you from expensive winter garage door repairs. Regular maintenance can help identify and resolve small issues before they escalate into major problems. Inspections, cleaning and lubrication care for its components, while preventing wear.
This proactive approach can also extend the life of your garage door, avoiding the need for a total replacement.
Protected Belongings
Your garage houses everything from vehicles to tools to gym equipment. An insulated, sealed garage door helps safeguard belongings from moisture and cold winter air.
Reduced Burst Pipe Risk
Many garages have water pipes running through the walls. Pennsylvania’s icy winters put these pipes at risk of freezing or bursting. Your garage door contributes to a stable indoor temperature, which can help prevent frozen pipes.
Winterize Your Garage Door With Drake Reed Door Co.
Get your garage door ready for winter with trusted service from Drake Reed Door Co. For over 50 years, we’ve cared for garage doors across Central Pennsylvania. We understand the unique challenges of PA winters. Our experienced technicians deliver expert installation, preventive maintenance and responsive garage door repairs.
Looking for an energy-efficient upgrade? Visit our showroom to view our range of residential garage doors from leading brands, such as Amarr.
Enjoy better garage door performance through every season. Call us at 717-266-2698 or schedule a service online today.
How to Insulate a Garage Door on a Budget
Are you considering insulating your garage door? It’s a worthwhile task with a long list of benefits, and you can even do it yourself. This guide will teach you how to insulate a garage door quickly and effectively. It covers the costs of using a professional service, cost-cutting tips and a step-by-step process for those who want to DIY the project.
Why You Should Insulate Your Garage Door
Insulating your garage door has many more advantages than you may think, including the following.
- Save on energy: You can save money on your energy bills by insulating your garage door, especially during the winter. Garage door winter insulation prevents the cold from coming indoors, thus slashing your utility bills. The insulation also traps hot air inside, making it one of the best ways of keeping your garage warm. Retaining the heat your HVAC system produces will make your family more comfortable while using less energy.
- Better for storage: Garages are ideal for storage. They provide convenient access to tools, cleaning supplies and other household items while keeping them out of the way. However, an uninsulated garage will let in more moisture, which can lead to mold damage. Insulating your garage creates a better storage area in your home.
- Make your garage quieter: Adding insulation to your garage door significantly improves its soundproofing. If your garage door faces a busy street or you have noisy neighbors, insulation can make things more comfortable for you. It will also reduce the sounds of your door opening and closing.
- Improve your door’s durability: An insulated garage door is more durable than a non-insulated one. During storms, it can handle impact better thanks to the additional layers provided by the insulation. Insulation is one of the many ways of making your garage door more secure and reliable.
- Protect your car from the cold: Your car is the most valuable thing in your garage, and winter weather can be harsh on vehicles. Among other hazards, your gas and brake fluids risk freezing. You can keep your car at the correct temperature by insulating your garage door.
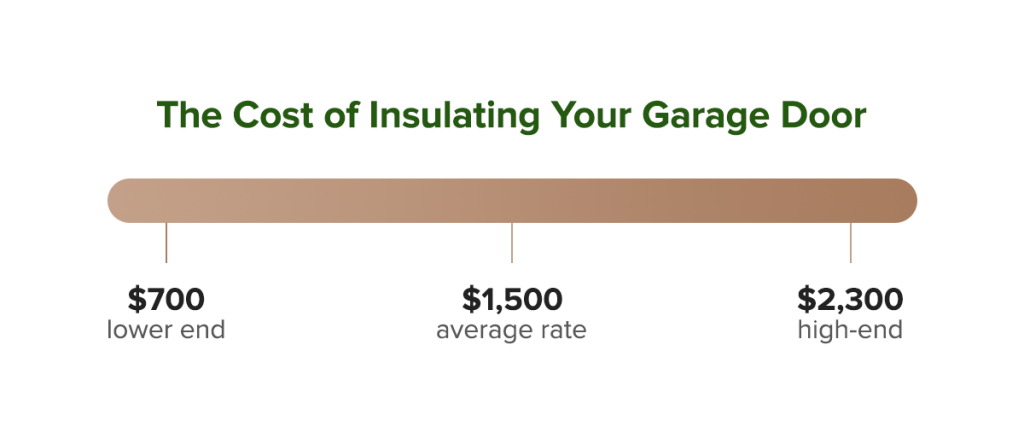
The Cost of Insulating Your Garage Door
Hiring a professional to insulate your garage door can be a budget-friendly option if you know what to look for. While the average cost to insulate a garage door is around $1,500, the lower end of the pricing scale is $700 and anything above $2,300 is high-end. However, your total price tag for replacing your old garage door with an insulated one will vary depending on your needs and door.
Four factors influence the cost of insulating your garage door:
- The materials used
- Your door’s size
- The cost of labor
- The amount of insulation required
You can buy pre-owned insulated garage doors or choose prefab options that are ready to install without needing further modifications. If you want to keep your current garage door and add insulation, doing it yourself is the most affordable choice. You can use a DIY garage insulation kit or gather specific tools and materials.
Preparing for Garage Door Insulation
Insulating your garage door yourself is a cost-cutting way of getting the job done. Of course, hiring a reliable company can save you time and money in the long run, but you might want to tackle the project on your own if you’re handy around the house and comfortable with do-it-yourself home improvement.
A DIY garage door insulation kit is a time-saving option that contains everything you need to complete the job. It costs around $50 and includes vinyl- or foil-faced batts or rigid foam. The kit also comes with retainer pins designed to make the job easier. The pins are lightweight metal or plastic and adhere to your garage door channels to keep the foam or batts in place.
Using an all-in-one kit is a time-saver, but if you want to do the work without a kit, you will need the following.
- Tools: Hammer, drill, utility knife, ladder, gloves, drywall screws, rags, staple gun and staples
- Materials: Drywall, insulation, batting, household cleaning agent and weatherstripping
How to Insulate Your Garage Door
Once you have everything you need, it’s time to start the process. This step-by-step guide will teach you how to insulate a garage door.
- Measuring: Measure 12 inches from each panel’s edge and halfway between the horizontal rails. Mark the spot and adhere the retainer pin base to the panel. Stick two retainer pins on each panel.
- Cut your batting: Measure your panels’ height and width and add an extra inch to both measurements to cut batting that will fit snugly in place. Measure each panel individually to avoid any mistakes. Mark the cutting lines on your batting with the vinyl side facing down. Place and cut the batting on a piece of plywood. Compress the insulation with a straightedge and use your utility knife to cut through the batting.
- Lock batting in place: Push the retaining pin in the exact center of the insulation until it punctures the vinyl facing. Snap the pin’s retaining cap into place. Wash the door panel with your cleaning agent, then rinse and let it dry. Repeat this process with each panel.
- Test your door: Insulation adds weight to your garage door, slowing it down or affecting its balance. A well-balanced door should stay in place when lifted and let go when partway opened. If the door is off-balance or fails to open, call a professional to adjust your spring tension to the new weight.
Find Budget-Friendly Garage Services With Us
Insulating your garage door by yourself can be costly and time-consuming, but Drake Reed Door Co. can give you affordable, trustworthy and expert garage door services. If you want a reliable garage door company in Central Pennsylvania, look no further. We use our years of experience to deliver top-notch work and friendly service with fair pricing.
To learn what we can do for you and your garage door, contact us online or call (717) 266-2698 to schedule your service today!
How to Lubricate Your Garage Door

When you open and close your garage door, the moving parts rub together as it cycles up and down. Keeping your door in peak condition by lubricating it can help extend its life span and prevent a noisy garage door.
Garage Door Lubrication Step-by-Step
Follow the steps below every six months for quieter, longer, safer garage door operation.
1. Inspect Your Door and Disconnect the Opener
Before lubricating your door’s components, take the time to inspect your door by completing the following:
- Tighten any loose nuts or bolts.
- Assess your rollers, which can break down and cause wobbling or noise.
- Inspect rollers and hinges for wear and tear.
- Tighten the opening system’s chain.
- Close the door and disconnect the opener’s power.
During this inspection, note any worn parts and replace them where possible, with one exception — the springs. These elements are under significant tension and require specialized tools and skills to change. Always contact a qualified professional for safe spring replacement.
2. Choose the Right Garage Door Lubricant
Garage doors need more than a standard WD-40 treatment. Opt for silicone-based or synthetic lubricants or white lithium grease for the best results. Your owner’s manual may also provide the manufacturer’s recommendations.
3. Clean the Garage Door Tracks
Debris-free tracks promote smoother roller operation. A vacuum can help you quickly remove larger elements. Once you’ve finished that, wipe the tracks with a damp cloth to get the smaller debris. For stubborn spots, try an automotive brake cleaner.
Tracks aren’t a moving part of the system, and we generally don’t recommend lubricating them.
4. Lubricate the Hinges and Rollers
The next step addresses the hinges and rollers. Start by lifting the door slightly and clearing any dirt or debris. Then, spray the lubricant on both sides of the hinges and brackets before removing the excess with a rag.
Lubricating the rollers is only necessary if you have metal ones — those made of plastic or nylon can degrade faster when exposed to petroleum-based agents. To lubricate metal rollers, use the straw to direct the spray onto the rollers’ ball bearings. Manually open and close the door to spread the lubricant evenly and wipe the excess with a cloth.
5. Lubricate the Springs and Bearing Plates
Keeping springs lubricated helps prevent corrosion which can lead to an early break. Spray them with the lubricant and use a rag or putty knife to spread the material around. Cycling the door by hand again can also help distribute the agent. Repeat the process with the bearing plates at the door’s top and remove any excess before moving on.
6. Lubricate the Armbar, Top Rail and Lock
Next, it’s time to lubricate the top rail where the chain travels and the armbar connecting it to the garage door. Add the lubricant and distribute it before removing any excess. Lastly, treat your garage door’s lock with grease to prevent rust and ease operation.
7. Reconnect the Opener and Check Your Work
Repower your automatic opener and test the door to see how it looks and sounds. If the noise remains or you notice something needing repair, reach out to a local garage door expert for an appointment.
Contact Drake Reed Door Co for Scheduled Maintenance
Drake Reed Door Company is your trusted source for preventive garage door services throughout central Pennsylvania. Our team has a five-decade-plus history of exceptional service and industry expertise.
Call us at 717-266-2698 or contact us online to request a service appointment.
The Best Ways to Heat Your Garage
Central Pennsylvania winters often come with frequent ice, snow and cold temperatures. If you want to have a pleasant experience going into your vehicle each morning, it helps to have a heated garage. Keeping your garage warm can also protect any temperature-sensitive items or supplies you store there.
Request Estimate Request Service
How to Heat a Garage
The following three tips that will help you safely heat your garage in winter:
1. Determine Your Heating Needs
No two garages are alike. Before you choose a heating approach, you’ll need to evaluate several elements, such as the square footage of the space, how warm you want your garage to be and whether you have adequate insulation. If you plan to purchase a heating unit, these factors will help you determine the output it needs to deliver, measured in British Thermal Units (BTUs).
To calculate your BTU requirements, measure your garage’s length and width in feet, multiply the two figures together, and divide the result by 200. Multiply this amount by 6,000 if you have sufficient insulation or 9,000 if you have poor or no insulation to arrive at the appropriate BTU number.
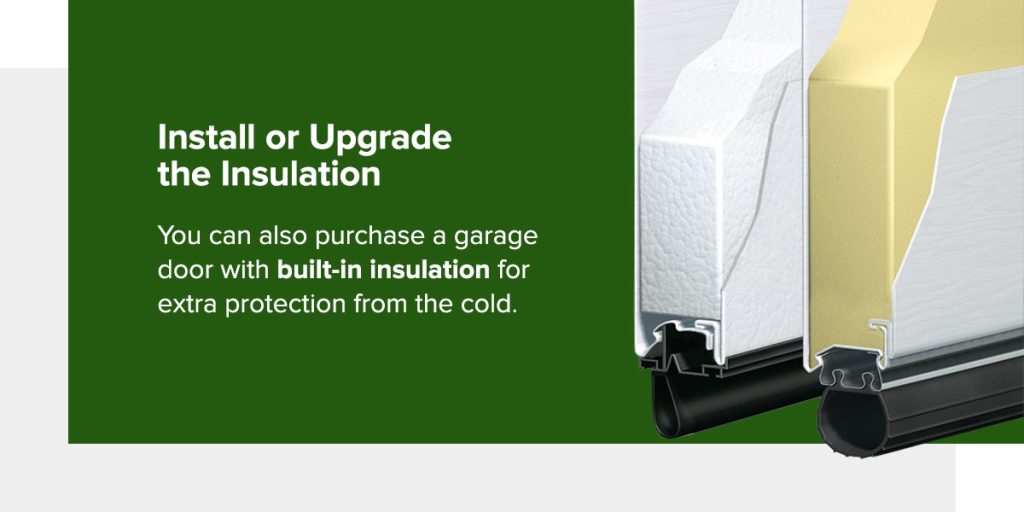
2. Install or Upgrade the Insulation
Adding new insulation or replacing worn material is often the most cost-effective solution for heating a garage, as it will keep warm air from escaping. Insulate the ceiling and any walls directly exposed to the outside, place clear plastic shrink-wrap over windows, and use weatherstripping on the garage and entry doors. You can also purchase a garage door with built-in insulation for extra protection from the cold.
3. Choose a Heating Device
If you want your garage to be warmer after installing insulation, you may need to install a heating unit. Available options and some of the pros and cons of each include:
- Combustion space heaters: These units rely on a fuel source like kerosene or propane. Although they’re less expensive to purchase than electric space heaters, they require an ongoing fuel investment.
- Convection heaters: This heater type operates via circulated air currents. It will heat your garage space evenly, but it doesn’t filter the air, which can create dirt and dust accumulations.
- Ductless heaters: A ductless heating system consists of an outdoor air compressor and an indoor air-handling unit. While these devices are energy-efficient and environmentally friendly, they’re typically more expensive than other options.
- Electric panels: Ceiling-mounted panels are energy-efficient and easy to install. A potential drawback is that their elevated location may not generate enough heat in the lower portion of the garage.
- Electric space heaters: These portable units provide maximum placement flexibility and don’t require ventilation. However, they only heat smaller areas and can pose a fire hazard.
- Forced-air heaters: This heater type uses a fan or blower to distribute heated air. They offer the convenience of connecting to your home’s propane or natural gas line, but they require regular duct cleaning.
How to Heat a Detached Garage
Detached garages are more challenging to keep warm due to their exposure to the elements on four sides instead of three. The same heating options are available as with attached garages, although you may need a heating unit with a higher BTU output.
Contact Drake Reed Door Co. to Learn More
The experts at Drake Reed Co. can help you determine the best way to heat a garage. We also carry a wide selection of insulated garage doors to meet your temperature control needs. Contact us for more information or call us at 717-266-2698!
Request Estimate Request Service
Frequently Asked Questions About Insulating Garage Doors
Can you heat a garage without insulation?
Yes, but it can be extremely inefficient. Uninsulated garages lose 40-60% of heat through walls, ceiling, and doors. For cost-effective heating:
- Insulate garage door first (biggest heat loss) – R-12 to R-18
- Add wall insulation: R-13 minimum
- Insulate ceiling: R-30 to R-38
- Seal air gaps around frames
Insulated garage doors provide immediate efficiency gains. Upgrading from an uninsulated door to an R-16 door can cut heating costs in half for Central Pennsylvania garages.
Do insulated garage doors really make a difference?
Yes, insulated garage doors make a substantial difference:
- Uninsulated doors: Interior temps within 5-10°F of outside
- R-12 insulated: 15-20°F warmer than outside
- R-18 insulated: 20-30°F warmer than outside
Additional benefits:
- 25-40% reduction in heating/cooling costs (attached garages)
- 50% quieter operation
- More durable, dent-resistant construction
- Improved home comfort in adjacent rooms
What R-value do I need for a garage door?
Recommended R-values by garage use:
- Unheated storage: R-6 to R-9
- Attached garages: R-12 minimum
- Heated workshops: R-16 to R-18
- Living space/office: R-16 to R-18
- Central PA climate: R-16 recommended
Opting for an R-16 insulation offers superior insulation and greater energy savings. This R-value is recommended for Central Pennsylvania homes, striking an optimal balance between energy efficiency, comfort, and cost-effectiveness.